Showing posts with label AutoCAD. Show all posts

What is BAATUG?

Friday, April 15, 2016


What is “BAATUG”?
BAATUG is short for Bay Area ARCHIBUS Training and User Group. It is a FREE on-site, collaborative forum with one hour of free training on a set topic and a second hour of round-table discussion for any topic(s) suggested by the group.

Who will be training us?
Our BAATUGs are led by Bob Stephen, CEO & Managing Director of RSC and is hosted by our clients.

Who attends a BAATUG?
The training consists of current clients and interested individuals wanted to learn more about ARCHIBUS, AutoCAD, and report writing.

Where are BAATUGs?
Our free on-site trainings are hosted by various clients located in the Silicon Valley and San Francisco Bay Area.

When are BAATUGs?
With the help of our clients, we host one BAATUG per quarter. They are generally on the 3rd Thursday of the month from 5/5:30PM – 7/7:30PM

Where have BAATUGs been held in the past?
Past BAATUGs have been hosted by a variety of our clients including, but not limited to: Lucas Film, Stanford, eBay, Monterey Bay Aquarium, and many more!

What else can you tell me?
Not only do attendees get a free training from an ARCHIBUS master, but it is also a phenomenal opportunity to meet with other ARCHIBUS users who are going through similar challenges and triumphs. Our attendees love the chance to discuss with other like-minded ARCHIBUS users and see how different companies are benefiting from their IWMS.

How can I get involved?
Are you ready for this? Pinterest is hosting a BAATUG at their brand new facility in San Francisco THIS MONTH! Check out our evite for more information and to RSVP to this one-of-a-kind free ARCHIBUS training.

Who do I contact if I’m interested in hosting?
If you would like to bring a BAATUG to your facility, please don’t hesitate to contact us at training@rsc2lc.com

Don't forget to check out our evite and RSVP to this month's BAATUG!


Like what you read?  Subscribe to the blog and follow us on TwitterFacebookLinkedin and Pinterest to keep up to date with the latest news from Robert Stephen Consulting, LLC.

Thoughts? Questions?  Comment below and let us know what you think!  We'd love to hear your insights.


Friday Training Follow Up: Smart Client Extensions for AutoCAD

Monday, February 22, 2016


Robert Stephen Consulting, LLC provides free 30-minute Client Training session every Friday at 10:00AM PST.  RSC prides itself in providing learning opportunities for our clients.  We feel that if our clients know the system better, we will able to work better with them to discover and implement the solutions that they need.  

Last week Matt Ritzman discussed AutoCAD, specifically Smart Client.  Below is an overview of the training.


SMART CLIENT EXTENSIONS FOR AUTOCAD

BACKGROUND

Smart Client Extension for AutoCAD tends to install fairly easily. Most of the time issues arise when there's a copy of Overlay installed on the same computer. Also, 20.x versions of Smart Client had difficulty switching away from Smart Client, and required editing the registry to allow AutoCAD to run with a regular profile.


COMPATIBILITY

Smart Client Extension for AutoCAD


The Smart Client version determines the compatible versions of AutoCAD allowed.
  • The version of Smart Client DOES NOT have to match the version of Web Central.
  • As an example, you can have Web Central 21.2 installed but run Smart Client 22.1, if you are on subscription.
  • If you are on subscription, you can install any version of Smart Client you like; it doesn’t require a database backend upgrade.
  • Generally, Smart Client is compatible previous versions of AutoCAD:
  • Smart Client 22.1 (which just came out 1 month ago) is compatible with AutoCAD 2016 (which came out last April).
Here’s the matrix for the some of the most recent versions:

Smart Client
21.1
21.2
21.3
22.1
ACAD 2009
yes
no
no
no
ACAD 2010
yes
yes
yes
no
ACAD 2011
yes
yes
yes
no
ACAD 2012
yes
yes
yes
no
ACAD 2013
yes
yes
yes
yes
ACAD 2014
yes
yes
yes
yes
ACAD 2015
no
no
yes
yes
ACAD 2016
no
no
no
yes

TROUBLESHOOTING


  • Smart Client needs to have an installation AutoCAD set in Preferences
  • Check that the profile is "Smart Client Extension for AutoCAD"
  • Support file search paths should have only Smart Client path information (paths should look like this: C:/Program Files (x86)/ARCHIBUS/2X.X NOT C:/Program Files (x86)/AFM2X.X).
  • Smart Client Path should be first in Support file search path
  • Use APPLOAD to be certain that only the routines you intend are being loaded.
  • Use CUILOAD to check which menus are loaded.
  • Use CUI to check which menus are visible
  • Sometimes the ribbon won't load. To get it to show up type: RIBBON
  • If the ARCHIBUS Ribbon panel does not show up type afm_disable into the command line and press enter. Then type afm_enable into the command line and press enter. The ARCHIBUS panel should now display in the ribbon.
  • Sometimes the drop down menu won't show up. Most of the time you can just set the workspace to AutoCAD Classic and that will solve the problem.
Additional checks for RSC tools:
  • Need to have RSC_SC_Main.lsp in the Startup Suite
  • Need Plotter configuration to be consistent across all computers using the system.

REGISTRY EDITS

Versions 20.X of Smart Client didn't release control of AutoCAD. An adjustment to the registry was required. To simplify registry edits, a batch file (*.bat) can be created.


AutoCAD without Smart Client Extensions

REGEDIT4
@ECHO OFF
; CLS
; REGEDIT.EXE /S "
%~f0"
; Start "" "C:\Program Files\AutoDesk\AutoCAD 2012 - English\acad.exe" -p std
EXIT

[HKEY_CURRENT_USER\Software\Autodesk\AutoCAD\R18.2\ACAD-A001:409\Applications\AfmOverlay]
"LOADCTRLS"=dword:0}}}}


AutoCAD with Smart Client Extensions

REGEDIT4

@ECHO OFF
; CLS
; REGEDIT.EXE /S "
%~f0"
; Start "" "C:\Program Files\AutoDesk\AutoCAD 2012 - English\acad.exe" -p "Smart Client Extension 
for AutoCAD"
EXIT

[HKEY_CURRENT_USER\Software\Autodesk\AutoCAD\R18.2\ACAD-A001:409\Applications\AfmOverlay]
"LOADCTRLS"=dword:2
This is the code for AutoCAD 2012. You will have to change the pathing for other versions of AutoCAD. Acad.exe will be in a different directory location, and you'll need to change the \R18.2\ACAD-A001:409\ portion of the registry key.

AutoCAD with Overlay

REGEDIT4

@ECHO OFF
; CLS
; REGEDIT.EXE /S "
%~f0"
; Start "" "C:\Program Files\Autodesk\AutoCAD 2012 - English\acad.exe" -p Overlay
EXIT

[HKEY_CURRENT_USER\Software\Autodesk\AutoCAD\R18.2\ACAD-A001:409\Applications\AfmOverlay]
"LOADCTRLS"=dword:0


If you'd like to know more about this particular training, email us at training@rsc2lc.com

We’d love to have you join us for this week's training on MicroView/SpaceView: SV Moves  this Friday, February 26, 2016. 

Please register by clicking on this link and follow the instructions:
Registering is required to receive a confirmation email and a link to the training.

Our weekly client trainings are held Fridays from 10:00 AM to 10:30 AM PST.  This is an opportunity to learn more about an area of ARCHIBUS that you may not be familiar with.  

We look forward to seeing you there!


Like what you read?  Subscribe to the blog and follow us on Twitter, Facebook, and Linkedin to keep up to date with the latest news from RSC, LLC.

Thoughts? Questions?  Comment below and let us know what you think!  We'd love to hear your insights.


Creating an efficient, simple solution in Meridian and ARCHIBUS

Wednesday, December 23, 2015


Many of our clients use very technical and advanced systems and software in order to make their business run seamlessly. Sometimes, those systems don’t integrate like they should, though.

One of our clients uses Meridian to store their files and log changes made. For those unfamiliar with it, I’m oversimplifying, but it’s like Dropbox on steroids. It allows a team to save documents but it also saves any changes you make to the stored documents. This client also uses ARCHIBUS for their Management AutoCAD drawings. However, the two systems didn’t play well together. That created a headache and lots of extra work on a regular basis.

The day finally came, though, when our client was ready to upgrade.

Turning an issue into an asset

Together with Hagerman and Company, our team sat down to figure out where and how the systems could be integrated. It was a team effort and everyone did a fantastic job. I have to give a special shout out to Matt Ritzman, though, because he did an absolutely fantastic job for our client!

Our team set up a test environment (it’s always best to test in a separate space so that the real thing stays live!) and provided training on ARCHIBUS. Hagerman and Company provided software and expertise on Meridian. Together, we determined several key areas where data could be shared to improve efficiency and enhance the user experience.

Creating a better version for today and leaving room for future enhancements

After the integration was complete, our client was thrilled. Not only were they now able to store ARCHIBUS facilities management (FM) drawings within the Meridian vault, but they could also access those files from either system (thanks to ARCHIBUS’s Smart Client Extensions for AutoCAD). The systems also synchronized information so that everything could be looked at in real time.

Oh – and for the future? We’ve got the ability to add some pretty spectacular future enhancements:

  • Drawings opened from ARCHIBUS Smart Client could automatically “Start a Change” and     initiate the checkout process – just as if they were opened in Meridian.
  • ARCHIBUS could take advantage of Meridian’s revision history to restore drawings to a previous point in time.
  • Synchronization tools will allow us to track data flow between the two systems.
  • Meridian will be able to help produce and manage documents (work orders, manufacturer recommended procedures, leases, survey documents, and more).

Simplifying life and work for our valued clients

Yes, our client asked for our help with this upgrade process, but it really was our pleasure to help them. Not only is their whole process now a lot simpler, it’s also better to use. They’ve let us know several times how much better their customized solution works – and how grateful they are for our help!

It’s getting that kind of feedback that keeps my team motivated, overachieving, and looking for new, creative ways to problem solve.

Like what you read?  Subscribe to the blog and follow us on Twitter, Facebook, Linkedin and Pinterest to keep up to date with the latest news from Robert Stephen Consulting, LLC.

Thoughts? Questions?  Comment below and let us know what you think!  We'd love to hear your insights.


Friday Training Follow Up: AutoCAD Basics

Monday, November 23, 2015


Robert Stephen Consulting, LLC provides free 30-minute Client Training session every Friday at 10:00AM PST!  RSC prides itself in providing learning opportunities for our clients.  We feel that if our clients know the system better, we will able to work better with them to discover and implement the solutions that they need.

Last week Matt Ritzman, our AutoCAD expert, discussed the basics of AutoCAD.  In the training, Matt set 3 goals:
  1.  Learn how to get around AutoCAD
  2. Learn how to find out more
  3. Learn how to do specific tasks that relate to ARCHIBUS
Below you can find a basic outline for the bulk of the training.

GETTING STARTED

When you open AutoCAD (and I encourage you to do so)  You’ll find an interface that is much like many Windows interfaces.  Standard Menus, buttons, status items.  One big thing that sticks out is the Command Line interface.  This element has a long history that goes back to a time before Windows.  Although you can get by without considering the command line, I highly, highly, highly recommend that you give it some priority.

Command Line

Even when you aren’t using the command line directly, you are using it.  So you might as well embrace it.  Always trust the Command Line.  The command line gives a history of what has happened.  Press F2 – to see an expanded view of the command line

Elements
  • Prompt – Command:
  • Enter to submit command
  • ESC Escape key to get out of a command (sometime you have to use escape multiple times)
  • Available options: Specify other corner point or [Chamfer/Elevation/Fillet/Thickness/Width]
  • The capitalized letter is a short cut

Buttons, Menu, Ribbon

  • Buttons 
    • Click to engage a command 
  • Menu 
    • Tree structure access to commands and tools
    • “A” 
  • Ribbon 
    • “New” access to tools
    • Context sensitive
    • Potentially more dense 
  • Quick Access Toolbar 
  • Customization 
    • EVERY element in AutoCAD can be customized

Mouse

  • Point Click
  • Middle Mouse Button
  • Right-click
    •  Enter 
    • Click-hold = Context menu
    • Available everywhere
    • Context sensitive
    • Even in the command line 
  • Shift-right click
  • Ctrl/shift right click

Grips

  • Click to move, stretch, add vertex
  • Shift Click to select multiple
  • Ctrl click to duplicate object

Palettes

  • Tool Palettes ctrl+3
  • Properties Palette ctrl+1
  • Design Center ctrl+2
  • Layers, Xref and others

Status Bar Tray

  • Crosshair location
  • Snaps
  • Interface elements
  • Model Space

Modify

  • Turn Palettes on and off
  • Add and remove toolbars

Intro to Options

  • Most of the program preferences are held here 
    • Profiles 
      • Setup for different tasks
    • Support File Search Paths 
    • Display 
      • It may be worth changing the background for various profiles
      • Crosshair size (CURSORSIZE)
    • Drafting
      • Aperature size (cursor size when selecting an object)
    • Selection
      • Pickbox size (PICKBOX)

Workspaces

  • Save your interface


As a reminder, we will not have training on Friday 11/28 due to the Thanksgiving Holiday.  We are excited, however, to announce our next training on Friday 12/04.  Below are some details on registering.

Please register for RSC's Friday Client Training: TOPIC on Friday, 12/04 10:00 AM - 10:30 AM PST at: https://attendee.gototraining.com/r/3799759723318496001

This week's free 30-Minute training will cover System Administration, specifically Roles & Users

To attend the meeting you must register! After registering you will receive a confirmation email containing information about joining the training.

Like what you read?  Subscribe to the blog and follow us on Twitter, Facebook, Linkedin and Pinterest to keep up to date with the latest news from Robert Stephen Consulting, LLC.

Thoughts? Questions?  Comment below and let us know what you think!  We'd love to hear your insights.


AutoCAD Advantages: What is Polylining?

Friday, November 6, 2015


This week's article comes to you courtesy of our very own Matt!  Matt is our AutoCAD expert here at RSC.

What is Polylining?

Drawing clean up consists of:

  1. Determining accurate locations of physical objects
  2. Reconciling the drawings to CAD standards (using proper layers, naming conventions, and blocks)
Someone must walk the floors, taking measurements and accounting for the space.  They will then provide a fairly accurate representation of each floor of the building.  They will indicate where walls, windows, doors, stairs, offices and desks are located.  Their completed drawing will look something like this:

 Polylining consists of:

  1. Creating representations of physical objects (usually polyline shapes) in the drawing.  In this case, it will be the physical area occupied by each room, using BOMA standards.
  2. Connecting those drawing objects to the database, by providing a primary key (or unique identifier) that specifies that particular room.
  3. Adding additional information to each room object in the database so that properties of the space can be tracked.  We add room types, categories and standards, so that the database can run reports on how much space is occupied by services (Primary Circulation and Mechanical Rooms, for instance.)
Polylining basically starts with a drawing that is essentially a collection of colors and shapes and adds a layer of information on top of it.  This information can be mined for interesting relationships and reports.

Here is an image of a shaded floorplan indicating all the room types on this floor.  The polylines are the boundaries of the individually shaded rooms.


Like what you read?  Subscribe to the blog and follow us on Twitter, Facebook, Linkedin and Pinterest to keep up to date with the latest news from Robert Stephen Consulting, LLC.

Thoughts? Questions?  Comment below and let us know what you think!  We'd love to hear your insights.


AutoCAD Advantages: RSC AutoCAD Interface

Friday, September 11, 2015


Robert Stephen Consulting, LLC maintains AutoCAD tools that help manage drawings for our staff and clients.  We’ve recently updated the RSC AutoCAD interface.  Here are some of the new features:
  • Simplified AutoLoader installation (for ACAD 2013 and above).The RSC commands are available on 
  • the ribbon, as toolbars, and as drop down menus for access in classic view.
  •  All the Hatch and Query Text commands function against the HQ database.
  •   Glorious new icons. 
  • All  ARCHIBUS Smart Client ribbon functionality has been migrated into the Classic View

To showcase a single tool, you can view an example of the List Layers function in action.


This tool helps with drawing clean up by providing a list of layers inside the drawing.  This list  can then be edited with any AutoCAD tools.  You can merge layers (LAYMRG)  in this  list with the standard layers or delete (LAYDEL) them entirely.

Disclaimer
These tools have been collected and developed to improve the workflow at RSC and to provide a starting point for adding client specific customizations.  They range from ho-hum to awesome.  Some of them work flawlessly, and just how you expect.  We are constantly striving to improve the ways we help clients.

Special Thanks to:
And many others


Like what you read?  Subscribe to the blog and follow us on Twitter, Facebook, and Pinterest to keep up to date with the latest news from Robert Stephen Consulting, LLC.

Thoughts? Questions?  Comment below and let us know what you think!  We'd love to hear your insights.


What's wrong with my AutoCAD file?

Friday, July 17, 2015


AutoCAD used to have a reputation for crashing and corrupting files regularly.  Talk to any long time CAD user and you'll hear plenty of horror stories.

The program has gotten much more reliable, but it is still very complex, and there are a lot of moving parts, so I am often consulted on drawing problems.

There are a lot of tools for investigating what's in a drawing.  One of my favorites is the QSELECT command.

QSELECT provides a console to create a selection based on various criteria.


Certain objects tend to be problematic:

  • Points
    • Since they don't print, points can be placed anywhere.  They often throw off the drawing extents.
  • Blocks
    • Blocks are extremely useful, but blocks can also become corrupted.  It is worthwhile to keep track of your blocks and know what blocks are supposed to show up in your drawing.
  • Attributes
    • Attributes are ALWAYS supposed to be contained in a block.  If you have an attribute outside of a block, it should be deleted.
  • Proxy objects
    • Proxy objects are created by add-ons to AutoCAD.  They can become corrupted or they may not render properly in a version of AutoCAD that doesn't have the add-on.
  • Splines
    • Splines are not always rendered properly.
  • 3D shapes
    • 3D shapes add a lot of extra data to the drawing.  It is an extra burden that can cause a drawing to render slowly.  I prefer to remove them when possible.
  • Empty text
    • Text and Mtext containers without text inside can increase the size of a drawing with no benefits.  Recently the PURGE command was adjusted to deal with empty text objects.
By using filtering abilities in QSELECT you can find, adjust, and potentially delete individual items that cause drawing issues.


Like what you read?  Subscribe to the blog and follow us on TwitterFacebook, and Pinterest to keep up to date with the latest news from Robert Stephen Consulting, LLC.

Thoughts? Questions?  Comment below and let us know what you think!  We'd love to hear your insights.

This phenomenal article was brought to you by our very own AutoCAD Wizard Matt R!  Matt is our go to guy for all things AutoCAD.  Matt is always willing to help out no matter what the task or assignment is.  His knowledge and expertise in AutoCAD is one of the many things that makes him an invaluable member here at RSC.

AutoCAD Advantages: BPOLY Command

Friday, May 8, 2015


Here is a little tip shared by one of our AutoCAD experts, Matt, at Robert Stephen Consulting, LLC.  Enjoy!


Background

The BPOLY command is useful to create a polyline that bounds existing geometry. It is much like the HATCH command or a paintbucket/flood-fill in a paint program.

General Usage

Often lines around a room are determined as LINEs or XLINEs. BPOLY is then used to create the polyline that fills the Remaining Area without any gaps.
After all the rooms have been PLINE'd, BPOLY is used to create circulation and other remaining spaces.

Cautions

We’ve found a little problem with the BPOLY command.  The BPOLY command may skip vertexes when you use it on

  • A fairly large area 
  • Containing small vertex offsets
There are two solutions:
  1. Split large areas into smaller ones (particularly large circulation spaces). 
  2. Use special care to be certain that vertices align.


How big is this problem?  This appears to happen with distances on the order of 1/100,000.  It could cause your total area to be off by fractions of a percent overall. 

The real problem arises when we have to track down a remaining area in a drawing and run across these little glitches.  It is becomes difficult to tell where the actual problem lies.

  • Polylines should be Concave whenever possible
  • BPOLY is view dependent, the entire area to be filled needs to be viewable on the screen before running the command.
A complicated area, like this:

Should be simplified to something like this:


As always, we hope you enjoyed our post.  Please comment below with any thoughts, feedback, or questions.  We love hearing from you!

Subscribe to the blog and follow us on Twitter, Facebook, and Pinterest to keep up to date with the latest news from Robert Stephen Consulting, LLC.


AutoCAD Answer Day on Twitter

Thursday, May 7, 2015

Did you know AutoCAD is having their first ever Answer Day right now?!  If you have any AutoCAD questions, tweet them directly at @AutoCAD from 6AM to 6PM PST.  This is an awesome opportunity to get your questions answered directly from the source in real time.  Don't miss out on the awesome opportunity!

AutoCAD Advantages: Ready, Set, Break!

Friday, April 10, 2015


Here is a simple yet awesome tutorial one of our AutoCAD experts did on the break tool.

Hope you enjoy!


Subscribe to the Robert Stephen Consulting, LLC blog to keep up with all the latest from RSC, LLC.

AutoCAD Advantages

Friday, March 13, 2015

In this "edition" of AutoCAD Advantages, we thought it a great idea to share some basic glossary terms to help better your understanding of AutoCAD.
Coordinates


  • X,Y,Z values indicating a cartesian coordinate system for placing all objects. Most of the time Z=0
  • Basically, it is a grid system for describing location.
There is a defined origin (0,0) The unit measurements are also defined (inches, mm, cm, etc.) Coordinates are indicated with the horizontal value (X) first, then the vertical (Y).
Units
Base unit of measurement. Everything is expressed in terms of this measurement. There’s a bit of complexity involved with this information – Architectural, Decimal, Engineering, Surveying Mm, cm, m, inches, feet, yards… The file has to know what kind of units it uses, and what kind of units other drawings are coming in at, and unit conversions have to take place. 1inch = 2.54cm, for instance
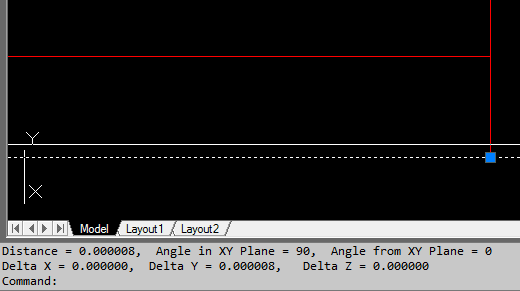
Extents

The rectangle that contains all the visible information in the drawing. The extents of this drawing is shown by the blue dotted box. If you were to zoom to the extents, all the lines and points would be visible. The system variables EXTMAX and EXTMIN refer to the upper left point and the lower left point of the rectangle.
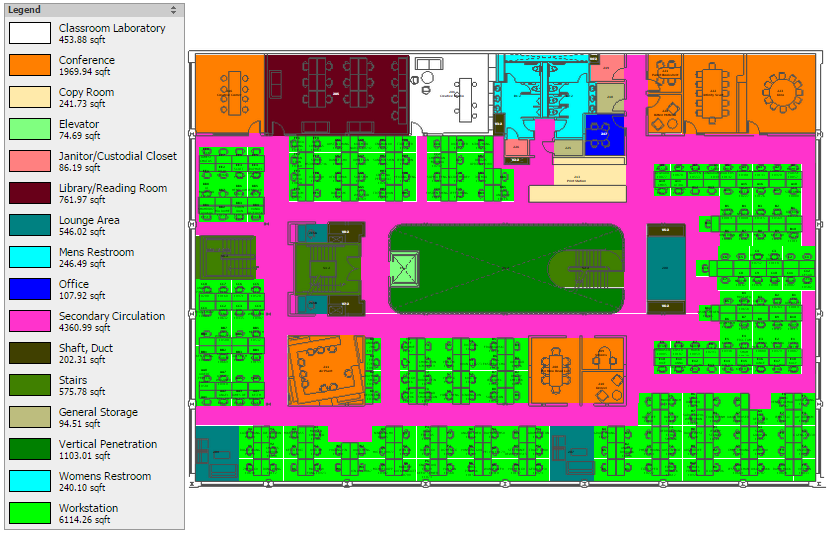
Layers
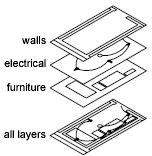
The organizational system for drawings - All items on a layer share certain properties and can be turned on and off as a group. This is often explained as a bunch of layers of tracing paper on top of each other. I find that explanation a bit simplistic. Layers are used for controlling visibility and line thickness as well as organization. On/Off vs. Thawed/Frozen - On/Off layers are loaded into memory, so they can be quickly toggled. Thawed/Frozen require a drawing refresh (the difference was a HUGE deal back in the day - there was a significant trade off with performance - not so noticeable now).
Blocks
containers of geometry. Allows the program to use shorthand when dealing with multiple instances. It isn’t 20 do-hickeys, it is 1 do-hickey referenced 20 times. These could also be considered internal references (as opposed to external references), or a file within a file. There's a presentation, here that I've used to explain blocks and Xrefs. I'd be happy to review it at some point. When inserted the program mostly only cares about: Insertion point (insPoint) the X,Y,Z coordinates of the block Scale factors (X,Y,Z) these can all be adjusted separately, but usually aren’t Rotation – a number generally expressed in degrees
X-refs
External References. Allows an autoCAD drawing to contain another AutoCAD drawing. Originally this was used to make working with a file much faster. The current file doesn’t allow you to edit the information in the reference. Now it is used to allow mutlitple people to work on a single drawing. It is also useful for organization. I think of this as a pointer from one file to another. There's a presentation, here that I've used to explain blocks and Xrefs.
  • Nested X-ref – A file contained within a file.
  • Attached – firm connection to the drawing, passed through if this drawing is Xrefed into another drawing
  • Overlayed – file just sits on top – not passed along if containing file is xrefed into another drawing.
Model Space


Model space is where the drawing takes place. 3D is available. Everything is drawn 1:1.

Paper Space


Consider this a print preview. Only 2D available. Viewports into Model Space, show areas at scale. You can have two areas at different scale (close and far) at the same time.
Grid
a rigid coordinate system where only certain values are acceptable for snapping purposes. See coordinate system
Purge
Removes unused entities (they exist in the drawing definitions but aren't visible).
Colors
There are a few color spaces that you may have to deal with: RGB (millions of colors) , and AutoCAD colors (256 colors) This is similar to the web based color palette, but not exactly the same.
RGB
Red Green Blue - Color Space for mixing light. Also expressed as a coordinate system R,G,B (can this get any more confusing?) Are colors giving you any problems?
AutoLISP
One of several programming languages in AutoCAD. Based on, but different from Common LISP. There's a great online resource here.

Question:  Are there any AutoCAD "glossary" terms you don't see here?  Let us know!  Leave a comment below with your thoughts and insight!  We love to hear from you.

Subscribe to the Robert Stephen Consulting, LLC blog to keep up with all the latest from RSC, LLC.